Eggplants, like other vegetable crops, are susceptible to pests and diseases. In my garden life experience, I have often faced these. But after I started taking some precautions and certain steps, I was able to get rid of those pests and diseases on my eggplant.
By following all the recommendations I have mentioned in this article for outdoor cultivation, you can minimize the number of treatments for eggplant pests and diseases. Also, you can get eco-friendly products by using biological protection on private farms.
Agronomic Measures to Protect Eggplant from Diseases
To reduce fungal diseases in eggplants, you can grow them in different areas over time. You should rotate crops and avoid planting eggplants in the same spot for 3–5 years. Choose good crop companions like beans, melons, carrots, cucumbers, onions, or early cabbage. I have written a complete guide on Best Companion Plants for a Vegetable Garden.
Another thing you have to do is always plant healthy seedlings without pests or disease signs. Avoid letting the plants grow too large and stop yourself from over-fertilizing, especially with nitrogen. It's also best to plant approved varieties that are resistant to multiple diseases, not just one.
Preparing the Soil for Growing Eggplant Seedlings in the Open Field
Since autumn, the soil has been enriched with humus, compost, and phosphorus and potassium fertilizers. For every 11 square feet of medium-quality soil, you can add 11–13 pounds (5–6 kg) of organic matter, one cup of wood ash, 30 grams of calcium superphosphate, and 20 grams of potash. If the soil is poor, then I recommend you double these amounts.
In case, your garden soil is heavy, add at least one bucket of mature humus. To improve water and airflow, fall planting and other seeding methods can be a good idea. Also, dig the soil as deep as a full shovel length. Deep digging can prevent your eggplant from black mole cricket nests.
Destruction of Mole Cricket
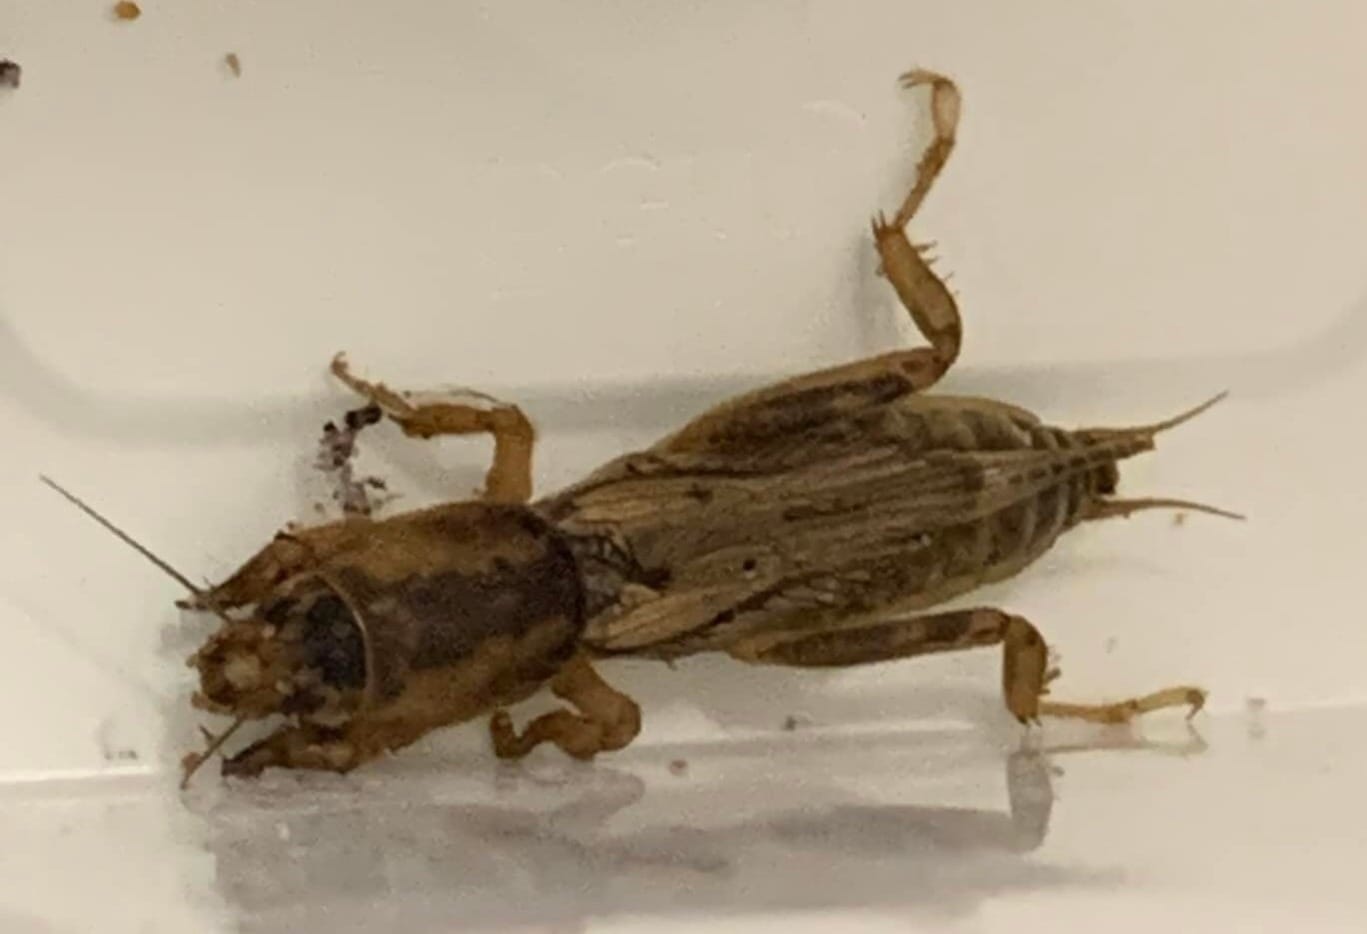
In the time of spring, I recommend you level the area under the eggplant with a rake. This process will help you to remove soil crusts and slow down the water evaporation process.
When the weather warms up and the soil in the top 4–6 inches (10–15 cm) reaches 57–59°F (14–15°C), or about 1–2 weeks before planting seedlings outdoors, it's time to get rid of mole crickets. These pests can damage almost all crops, so it's a good idea to treat the entire garden at once.
Preparing Bait for Mole Cricket
Unfortunately, the most effective method for eliminating Mole cricket involves using chemicals. Well, I also hate using any kind of chemicals and I always tried to avoid using them. But in this case, we have to take this step mentioned below:
I recommend you exercise caution during this process and adhere to hygienic practices. Depending on the size of your garden, cook a suitable amount of a grain crop like wheat, rye, or oats, or use coarse grains like peas. After this, cook them halfway and then drain any extra water. Add 2–3 tablespoons of sunflower oil (unrefined and aromatic if possible) and 1–2 amp of a strong-smelling pesticide or a similar alternative. Mix everything well, using double gloves or a flat stick to stay safe.
Bait Application
Section the field into squares by creating shallow furrows 1–2 inches (2.5–5 cm) deep at intervals of 12–16–20 inches (30–40–50 cm) using a sharp hoe. Moisten these furrows slightly with water, ensuring most of the trench is damp. This attracts Mole crickets from dry soil to the moist areas. After watering, place the prepared bait into the trench and cover it with a 0.8–1.2 inch (2–3 cm) layer of soil using a rake. The Mole crickets, affected by the insecticide, will suffocate in the soil, moving towards the surface. This process can last 3–4 days. Start removing the Mole crickets 2–4 hours later to prevent poisoning birds and domestic cats. Consistent baiting over 2–3 years can eliminate 80–90% of this pest from your vegetable garden.
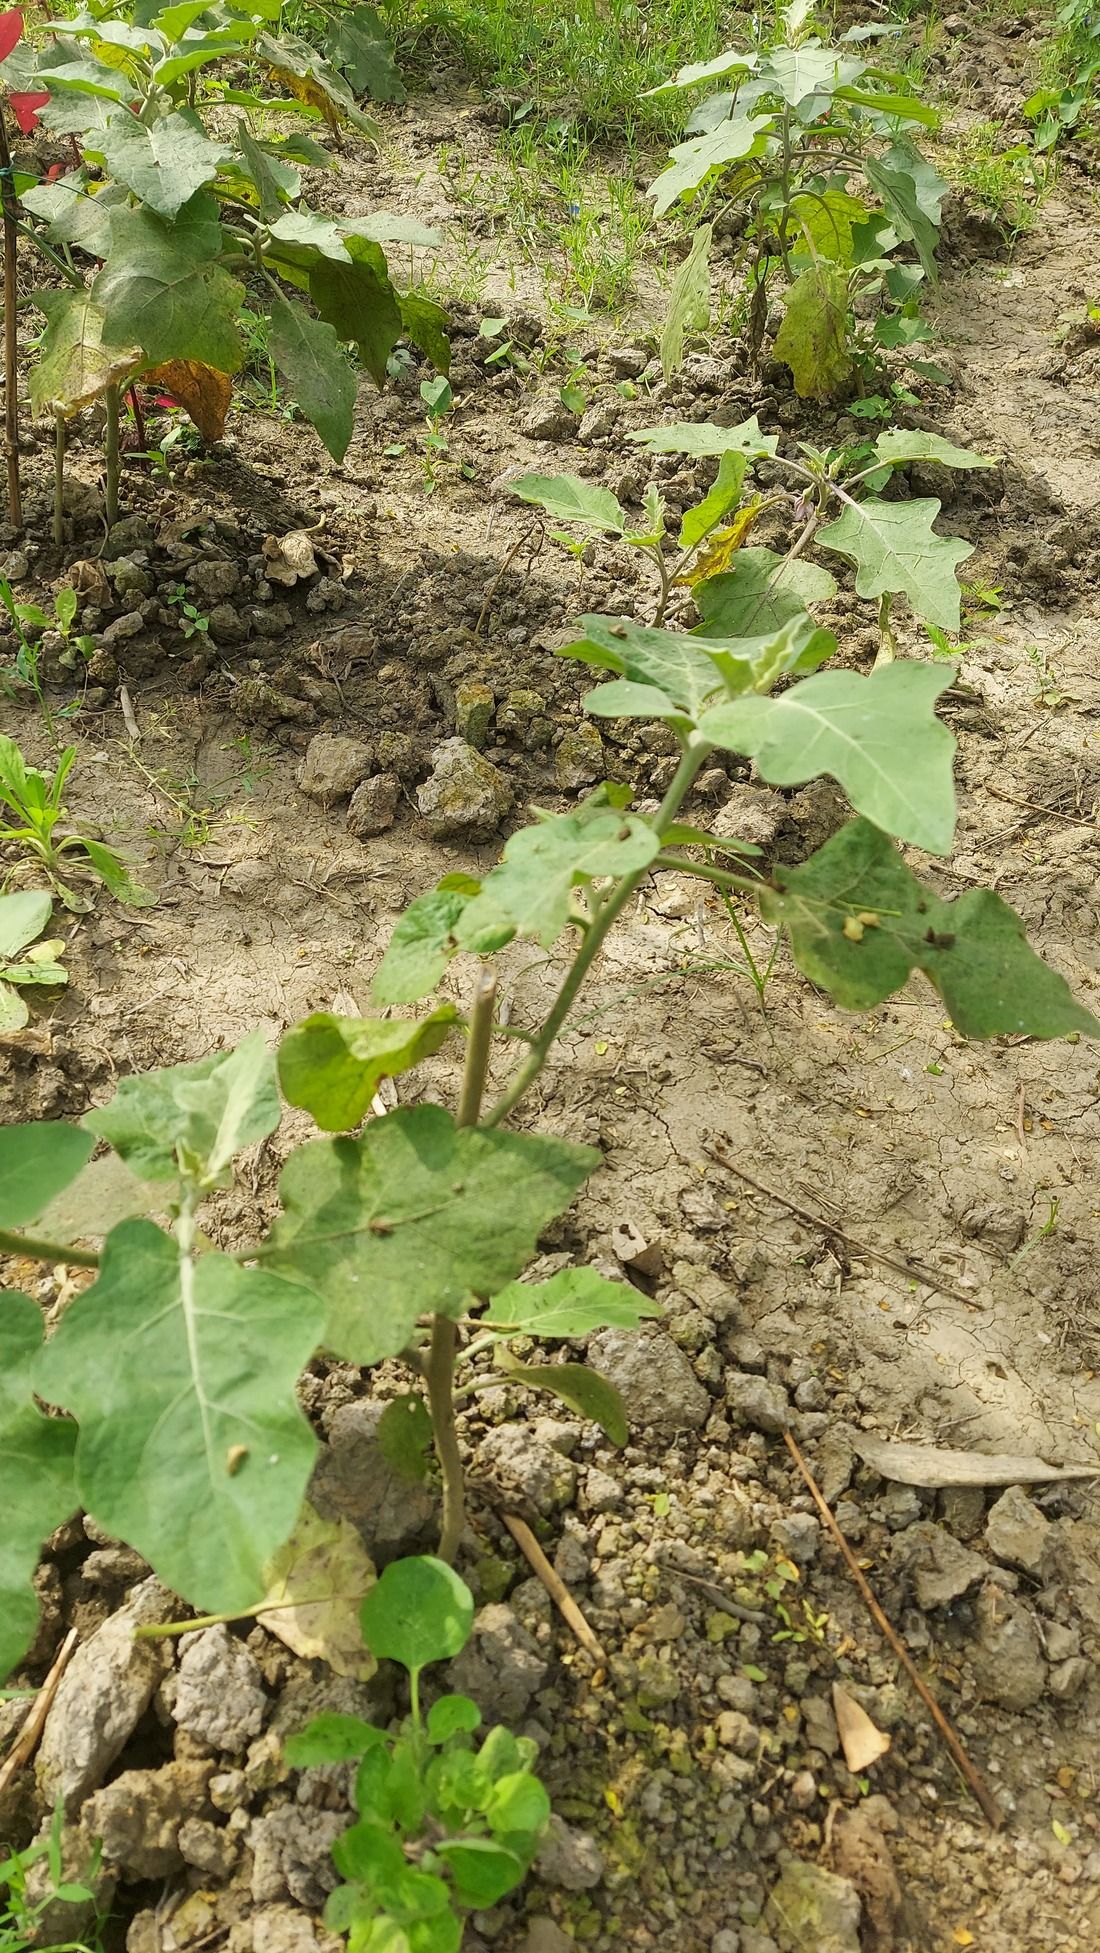
Planting Eggplant Seedlings
Plant seedlings in prepared soil during stable, warm weather typical for the region, ensuring soil temperature at the root level of 4–6 inches (10–15 cm) is at least 59°F (15ºC). Mature eggplant seedlings should have 5–7–9 leaves on a straight stem, 1–3 buds, and a well-developed root system. In the evening, immerse domestic seedlings in nursery containers filled with a mildly colored manganese solution of a rooting agent or other root-forming agents. Plant the seedlings in prepared holes before 10–11 a.m. or after 4 p.m. If the seedlings are purchased from a market, soak them in the same solution for 3–4 hours, dip the roots in clay putty, and plant them in the ground, previously sprayed with a 1% solution of Bordeaux mixture. The eggplants will take 1–2 weeks to establish roots. During this time, they can lose moisture quickly, especially on sunny days, leading to wilting leaves and loss of initial buds. To protect them, cover the eggplants with a single layer of non-woven polypropylene spandex (or similar material), secured on tall stakes 12–16 inches (30–40 cm) high to prevent sun scorch. Remove this temporary cover when active growth begins.
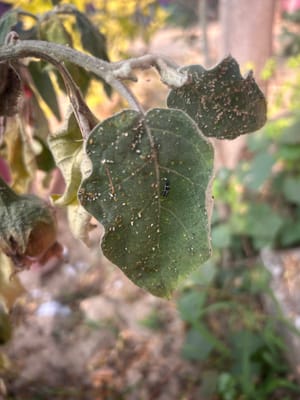
Diseases of Eggplant During the Growing Season
Throughout the growing season, eggplants can suffer from various diseases, including root rot, tracheal mildew (Fusarium, Verticillium, Phytophthora), leaf spot, and columnar diseases. Fungal and bacterial rots can severely affect the root system, leading to the plant's death. In addition to root rot, eggplants are also susceptible to fungi, bacteria, and viruses that harm the above-ground parts and fruits. Control of these diseases involves several methods:
- Biochemicals that are harmless to plants, humans, animals, and beneficial insects like bees.
- Chemical products that effectively combat diseases but can negatively impact human health and leave residues in agricultural products.
- Chemical agents in the form of plant decoctions and infusions, which possess fungicidal and insecticidal properties.
Organic Farming: Minimizing Chemical Use
To foster organic products in rural areas, it's advisable to limit chemical agents. I have also told you that I am not a big fan of chemical use in gardening and I hate using them.
Modern private gardeners can grow crops using natural-based protective agents (like effective fungi and bacteria microbiota), known as EM preparations. These preparations act as antagonists to disease-causing microflora in soil and plants, eliminating pathogens.
Addressing Eggplant Diseases with Biological Agents
When eggplants exhibit unexplained wilting, it may signal root fungal decay. Biological agents based on effective fungal microbiota are applied for soil treatment. To minimize treatment frequency, a tank mixture of several biological agents can be formulated.
Always remember to prepare each biological agent solution separately as per instructions and check their compatibility. If compatible, combine the individual solutions into one mixture.
These mixed solutions are very effective against pathogenic microbiota. Fungal-based biofungicides infiltrate and destroy the mycelium of harmful fungi, while bacterial fungicides act like antibiotics. For soil disinfection, both dry formulations and working solutions of other EM preparations, including unique organic (EM) concentrates, are effective.
Systems for Treating Soils with Biological Agents
Biological agents require systemic applications over time, especially after rain or in wet conditions. In order to reduce treatment frequency, use them in tank mixtures, offering protection against multiple diseases simultaneously.
Possible tank mixtures for soil treatment include:
- Trichodermin + Ampelomycin + Glyocladin + Binoram
- Glyocladin + Binoram
- Trichodermin + Bactophyte
- Planriz-Bio + Coniothyrium, etc.
Keep it in mind, that excessive treatment doesn't always yield positive results. Begin treating plants early, with the first soil treatment 10–12 days after sowing seedlings.
Plant Treatment Systems Using Biological Agents
For visible plant diseases (bud drop, leaf yellowing or curling, etc.), you have to apply biological agent solutions every 7–10 days during the growing period of eggplant. Supplement these solutions with micronutrients at budding and second fruit harvest stages. Add Gamair or similar to a pre-made soil spray mixture for enhanced effectiveness. No remedies exist for viral diseases (like Mosaic virus); affected plants should be removed and burned.
When using bio fungicides, accurately identify the disease and follow specific treatment recommendations. Misdiagnosis renders the product ineffective. If unsure, use a tank mix targeting multiple pathogens.
Chemical Protection of Eggplants Against Diseases
Chemical treatment of vegetable crops in homes or small gardens is not recommended due to their long degradation period and residual effects on humans, animals, and beneficial insects. If chemicals are used, cease treatment a month before harvest and follow recommended guidelines.
Chemicals vary in compatibility and specificity, leading to increased treatment frequency. New chemical agents, efficient in low doses with short waiting periods (3–20 days), are emerging. Exercise extreme caution with chemicals, avoid increasing doses during dilution, and use personal protective equipment to prevent exposure.
Plant Treatment Systems Using Insecticides
To fight against eggplant diseases like gray rot, Phytophthora, bacterial spot, and blackleg, you can utilize treatments such as Bordeaux mixture, copper sulfate, and liquid copper (Cu2+) fungicides. Protection measures typically commence 3–4 weeks after germination, extending to 2–3 weeks post seedling plantation. Treatment intervals range from 7 to 14 days, influenced by weather conditions.
Eggplant Pest Control
Eggplants are primarily threatened by aphids and the Colorado potato beetle. Aphids, small sucking insects, can rapidly devastate eggplant plantings by draining the sap from stems, leaves, and flowers. Colorado potato beetles, capable of destroying up to 80% of a crop, breed several generations each season. Targeting these pests also helps control spider mites, another damaging sucking pest. To deal with Aphids, I have written a complete guide on Aphids on Eggplant - How to get rid of it.
Biological Methods of Protecting Eggplant from Pests
Biopesticides, derived from effective fungi (avermectins), bacteria, and soil entomopathogenic nematodes, serve as biological agents against insect pests.
Bacteria-based biopesticides are effective. These can eliminate larvae of biting and sucking pests, with Bitoxybacillin being a common choice. These agents are versatile, applicable to vegetable, fruit, and berry crops, and perform well in protected areas.
Fungal-based biopesticides like thiamethoxam and imidacloprid are instrumental in early-stage pest eradication and can be applied even during harvest. Penicillin pesticides specifically target nematodes, crucial for eggplant seedling development and early cultivation phases.
Note that, EM fungi-based biological insecticides are effective in humid conditions around 77°F (25ºC). You should apply these after watering, in the morning, or after 4 pm. Store cautiously as they lose efficacy when frozen or exposed to sunlight. Compatibility checks are necessary when tank-mixing with biofungicides, and adherence to dosage and treatment duration is vital.
Using Chemical Agents to Protect Eggplants from Insect Pests
To control sucking and biting pests, treatments like Confidor Extra can be used on eggplants. Given their harmful nature, cease treatments before flowering. Typically, 1–2 sprays from it are enough, with the first as a preventative step and the second following after 2 weeks. In cases of epiphyte infection, apply these preparations or a mixed solution every 10 days. Remember! Complete all chemical treatments before the onset of extensive flowering.
Folk Remedies for Protecting Eggplants from Pests and Diseases
Traditional methods for safeguarding eggplants typically involve creating herbal decoctions and infusions to spray on affected crops. It's important to recognize that a single application is often insufficient, and repeated sprays can be more impactful than initially perceived.
While these natural remedies can be effective against pathogens, on the other hand, they may also carry some chemical properties that are not good for human health. Common practices include soot dusting, Dendrobium decoction spraying, mugwort use, or applying chemically treated Dioscorea pills during the growing season.
Walnut Leaf Infusion: To combat aphids, create an infusion with fall walnut leaves. Fill a metal bucket 2/3 full with the leaves, pour boiling water over them, and seal tightly to infuse through fall, winter, and spring. For application, dilute 0.26–0.52 gallons (1–2 liters) of this concentrate in 2–2.5 gallons (8–10 liters) of water and spray on plants after testing on a single plant for 3–4 hours.
Herbal Decoctions: Some gardeners advocate for preparing decoctions from mugwort, chamomile, and yarrow, using these to spray the plants.
Ash Spraying: Control aphids by spraying a grass ash infusion. Mix 1–1.5 cups of ash in 2.5 gallons (10 liters) of water, let it sit for a day, strain, and spray. Add green or laundry soap for better adherence.
Compound Decoction for Pests: In order to target Colorado beetle larvae and aphids, blend one cup each of dandelion leaves, onion, and garlic in 2.5 gallons (10 liters) of water with 1–2 tablespoons of soap. Let it soak for 2–3 hours, strain, and spray. This mixture is effective against spider mites, aphids, and Colorado beetle larvae at any development stage.
Various folk concoctions exist with differing effects. Each gardener can test and choose the most effective solution. Adhering to agricultural techniques and timely interventions can ensure a good harvest with minimal reliance on pest and disease control methods.